DESTINATION BEAUTY
"Exotic beaches or a simple stay-cation - what beautiful destination is your March Glam Bag getting ready for?" - ipsy.com
What
perfect timing, I am OFFICIALLY on Spring Break! And LOVING IT! You
know when you get to that point at the beginning of the year where you
just feeeeeel exhausted already and ready for a break....yeah....totally
there. Thank heavens for Spring Break! And yes, I shall be taking a
stay-cation, thank you! Haha, not to worry, my blogging won't be taking a
break. I'm going to be snuggling into the couch with some coffee (and
fluffy, snuggly little whiskered bugaboos apparently who have already
begun) each day and write, write, write!
Speaking of writing....on to the review! Here's what I received:
A nail product, lip product, face product and eye product
Everyone
received a lip product - either a lipstick or lip gloss (from the same
brand), an eye product - either a quad or trio (different brands), and
the other two products (nail and face) were from variety selections.
The
bag was a special feature for this month as the design was actual
created by an artist named Klari Reis. Here is what Ipsy says about her:
"The
print of this exclusive ipsy makeup bag is a selection from artist
Klari Reis' geography-based series, "Street Anatomy," and showcases San
Francisco, CA (Reis' hometown and ipsy headquarters). To view more from
Klari, please visit her website at www.klariart.com. At ipsy we believe
inspiration comes in all shapes, sizes, colors, mediums and textiles!
This month's feature on Klari Reis is just the first of many in ipsy's
new Artist Series. Stay tuned to ipsy.com for more info on upcoming
opportunities for creative ipsters like you!" - ipsy Glam Bag March 2014 tag on bag
So
bright, colorful and whimsy, isn't it?! I looked through Reis' Street
Anatomy series and there are some pretty cute pieces in there. I'm
actually not a huge fan of the one they selected for the Glam Bag, maybe
it's because of the primary colors and brightness, but I really did
love some of the other ones. There was one that had purple and mauve
shades (listed as 21 of 25 on klariart.com) and one that had a large
portion of ocean in such a deep dark rich blue (22 of 25) that I thought
were stunning!
The
material seems to be a PVC or polymer and the inside is a deep
cornflower blue lining. From looking at other Glam Bags it appears that
the pattern isn't exactly the same, meaning they cut multiple bags from a
large piece of her art printed onto the material instead of everyone
receiving the exact same layout on the bag.
Moving on to what came INSIDE the bag!....
NICOLE BY OPI
NAIL LACQUER
ROUGHLES
in On What Grounds?
I have been DYING to try the new Roughles polishes out! And of course, the turquoise shade was top on the list ::winkwink::. Even though they seem to be very similar to OPI's Liquid Sands, I found the finish to be a little bit different.
The
bottle size and design is the same as a standard Nicole by OPI, the
only difference being the wrapper on the lid which lists the polish as a
Roughles and states No Top Coat (needed). The formula is like a creme
but has black and blue grain and grit dispersed throughout.

Here
is two coats (no top coat) shown in indirect bright sunlight. I
loooooooove this polish! The finish (unlike the Liquid Sands, which
definitely look like dried sand to me) is something like blasted
concrete. It is rough and grainy, but I didn't have any problems with it
catching onto my clothing or irritating my skin when I brushed against
it. It's definitely not sharp, just lightly rough. The formula is
absolutely fantastic. It needs two coats for full opacity (one coat was
very thin and uneven), but it does even out a bit during application and
it glides on well and doesn't clump up from the grain while brushing
on. It dries relatively quick as well, the first coat took about 5-10
minutes and the second coat took 10-15. The picture you're seeing above
was actually taken FOUR days after application. You can only see a
teensy bit of wear on the tip of my ring finger, but other than that it
was absolutely PERFECT. This stuff just does NOT chip off or scratch
off! I was scratching on it with my fingernails from my other hand to
show a friend how great it was and seriously....it IS like concrete,
doesn't budge. I was thinking that would make it so ridiculously hard to
take off though. I was going on and on in my head about what a pain
it'd be to soak it and work it off, bit by bit...but I'm here to tell
you...it comes off as easily as a sheer or gel polish. It was CRAZY. I
stuck one finger into one of those sponge jars with nail polish remover,
swirled the finger in the sponge opening and PRESTO...nail came out
clean! The polish was completely gone! I nearly faint....no joke.
Nicole by OPI Roughles line has three other shades available, and yes, they shall be mine, all mine! ::giggles:: All of the shades reminds me of Easter eggs, they're perfect for Spring/Easter time!
- Sand in My Shoe (yellow with orange-red specks)
- I'm Stucco on You (lilac with blue and red specks)
- Rock the Look (pink with red and black specks)
BARE MINERALS
MARVELOUS MOXIE LIPSTICK MINI
in Get Ready
"Creamy, super-saturated, ultra-pigmented color glides on like butter for full coverage in a rich satin finish." - bareescentials.com
How
cute is that little lippy. ADORABLE. So I've tried Bare Mineral's
Marvelous Moxie LIP GLOSS but not their lipstick, so I was stoked to
receive the lipstick option in my Glam Bag since I already owned the
shade of gloss they were sending out!
The
shade I received, Get Ready, is listed as a warm rosy pink, which is
definitely seems to be when swatched! The color is very pigmented and
most certainly full-coverage! The formula is smooth, creamy, glides on
easily and is also quite blendable if you want a lighter coverage with
just a light wash of color (see above picture for blended).
On
my lips it looks very rosy pink! I really do love this shade though,
it's classic but still leans a bit towards fun and girly. For this photo
I applied only a single layer (no lip liner). It is very buttery
feeling on your lips, but not heavy at all. It's also quite
moisturizing! As you can see it's not very shiny, but definitely not
matte, just a nice soft creamy satin.
As
far as longevity, I had full color with a satin finish for about 3-4
hours (with light eating and drinking), and a wash of rosy pink color
till about the 6 hour mark, afterwards it faded into a fair pink tint,
but never fully wiped off till I wiped it off myself with a makeup
remover.
All
in all, I really love this lipstick! I think it's very pretty, and
definitely a formula I would love to wear again. Here are the different
shades Bare Minerals offers for their Marvelous Moxie lipsticks:
- Make Your Move - soft neutral pink
- Live Large - berry rose
- Raise the Bar - pearlescent raspberry
- Break Away - luscious mauve
- Finish First - caramel cappuccino
- Be Free - creamy pink nude
- Rise Up - luminous bronze
- Speak Your Mind - blushing pink
- Light it Up - vibrant melon
- Lead the Way - rich plumberry
- Never Say Never - fuchsia pink
- Risk it All - energetic magenta
- Standout - rosewood
- Go the Distance - tangerine smoothie
- Call the Shots - rich scarlet
- Fly High - lavender pink creme
- Live it Up - cherry red
PIXI BEAUTY
MINI FLAWLESS BEAUTY PRIMER
"Even, flawless skin tone is the sign of youthful healthy skin. Sometimes
we need a little help with the glow from within. This primer is the
perfect solution; the formula is loaded with skin loving ingredients.
Formula contains powerful anti-aging and skin fortifying benefits.
Formula suitable for all skin types." - pixibeauty.com
Yay
Pixi Beauty! I love them! Haha, actually, every brand featured in this
month's Glam Bag I'm very familiar with. Usually, I always have at least
one new brand I've never tried. However, I haven't tried that
particular PRODUCT from each brand, so I'm superdupes happy!
Here is what Pixi Beauty says are the beneficial ingredients (and what they do) for this primer:
- Pearl extract for revitalizing, protection and anti-aging
- Truffle extract is a luxury additive rich in amino acids and minerals to tone and hydrate
- Vitamin E to increase skin elasticity
- Vitamin A is a powerful antioxidant
- Vitamin C has revitalizing and nourishing benefits
The
formula is a warm lightly rosy nude tone that does blend it when
applied and has no noticeable change in coloration on any skin tone I've
swatched it on (yes, I found friends for such purposes ::giggles::). The main difference it makes, visually, is in it's finish...

Here
is the swatch completely blended onto my hand, and as you can see, my
hand is glowing! Look at that pearly shine! It definitely adds a warm
glow to the skin. The
consistency of the primer is very smooth, not at all runny, and does
blend easily and evenly onto the skin. You really don't need very much
at all for complete and even coverage. When worn of the face, I
applied this primer first then I tried different types of foundations
(different days, of course, not all at once, hardeeharhar), including
two different BB creams (medium coverage matte finish, full coverage
dewy finish) and two different foundations (sheer to medium coverage and
full coverage) and after applied you could still lightly see the glowy
primer underneath making my skin's appearance seem fresh, bright and
with a subtle glow. It was AMAZING. It did not look overly shiny or oily
looking, and if I wanted to tone down the glow in any spots for a more
matte finish I just lightly dusted some loose powder with a large fluffy
brush over it.
As
a primer, it's not the most amazing I've tried, I have other primers
that keep your makeup on...well...forever it seems. Haha! This product
was not the worst I've tried either, though! It does give decent hold
and does keep your makeup fresh looking for at least 7-8 hours after
application (typical wear, no exercising or heavy sweating). To be
honest, I just love wearing this primer as a way to make my face look
glowy, fresh and bright. It just DOES something for my skin that makes
it look fantastic! I even had friends ask me what I had done differently
because my skin looked brighter. YES, LOVE THIS. I will most certainly
be buying more once I run out, although I love the sample size I
received! It should last me months I hope!
I wanted to touch on something really quick that a fabulous friend of mine brought up just the other day on makeuptalk.com. Leigh from the awesome blog, Whimsical Adventures of a Magical Mom,
asked if this product could be used as a primer for the EYES,
especially since it had such a gorgeous glowy effect. After looking at
the ingredients, I definitely advise NOT to use on the eyes as many of
the ingredients either aren't considered safe or could possibly be
irritating to the eyes such as ethylhexyl salicylate (an ester formed by
the condensation of of a salicylic acid with 2-ethylhexanol and used in
sunscreen - thanks Zadi from zadidoll.com
for further information on that!), silica (depends on what type),
polyacylamide
(possible), phenoxyethanol, titanium dioxide (depending, sometimes you
find them in mineral eyeshadows), and iron oxide (again, depending). The
primer isn't LISTED as not safe for use around eyes on Pixi Beauty's
website, but I'd say the likelihood of it being irritating to the eyes
is too great a risk to chance it. Just to note!
BE A BOMBSHELL
EYESHADOW QUAD
in Bora Bora
Be still my beating heart.....it's EYESHADOW! Wait, wait, hold the phone...let me rephrase....it's TEAL EYESHADOW!
Hahaha,
really when I saw this quad in the sneak peeks I just HAD to have it. I
was ready to purchase the darn thing if I didn't receive it in my Ipsy
Glam Bag. Lucky for me, I did!
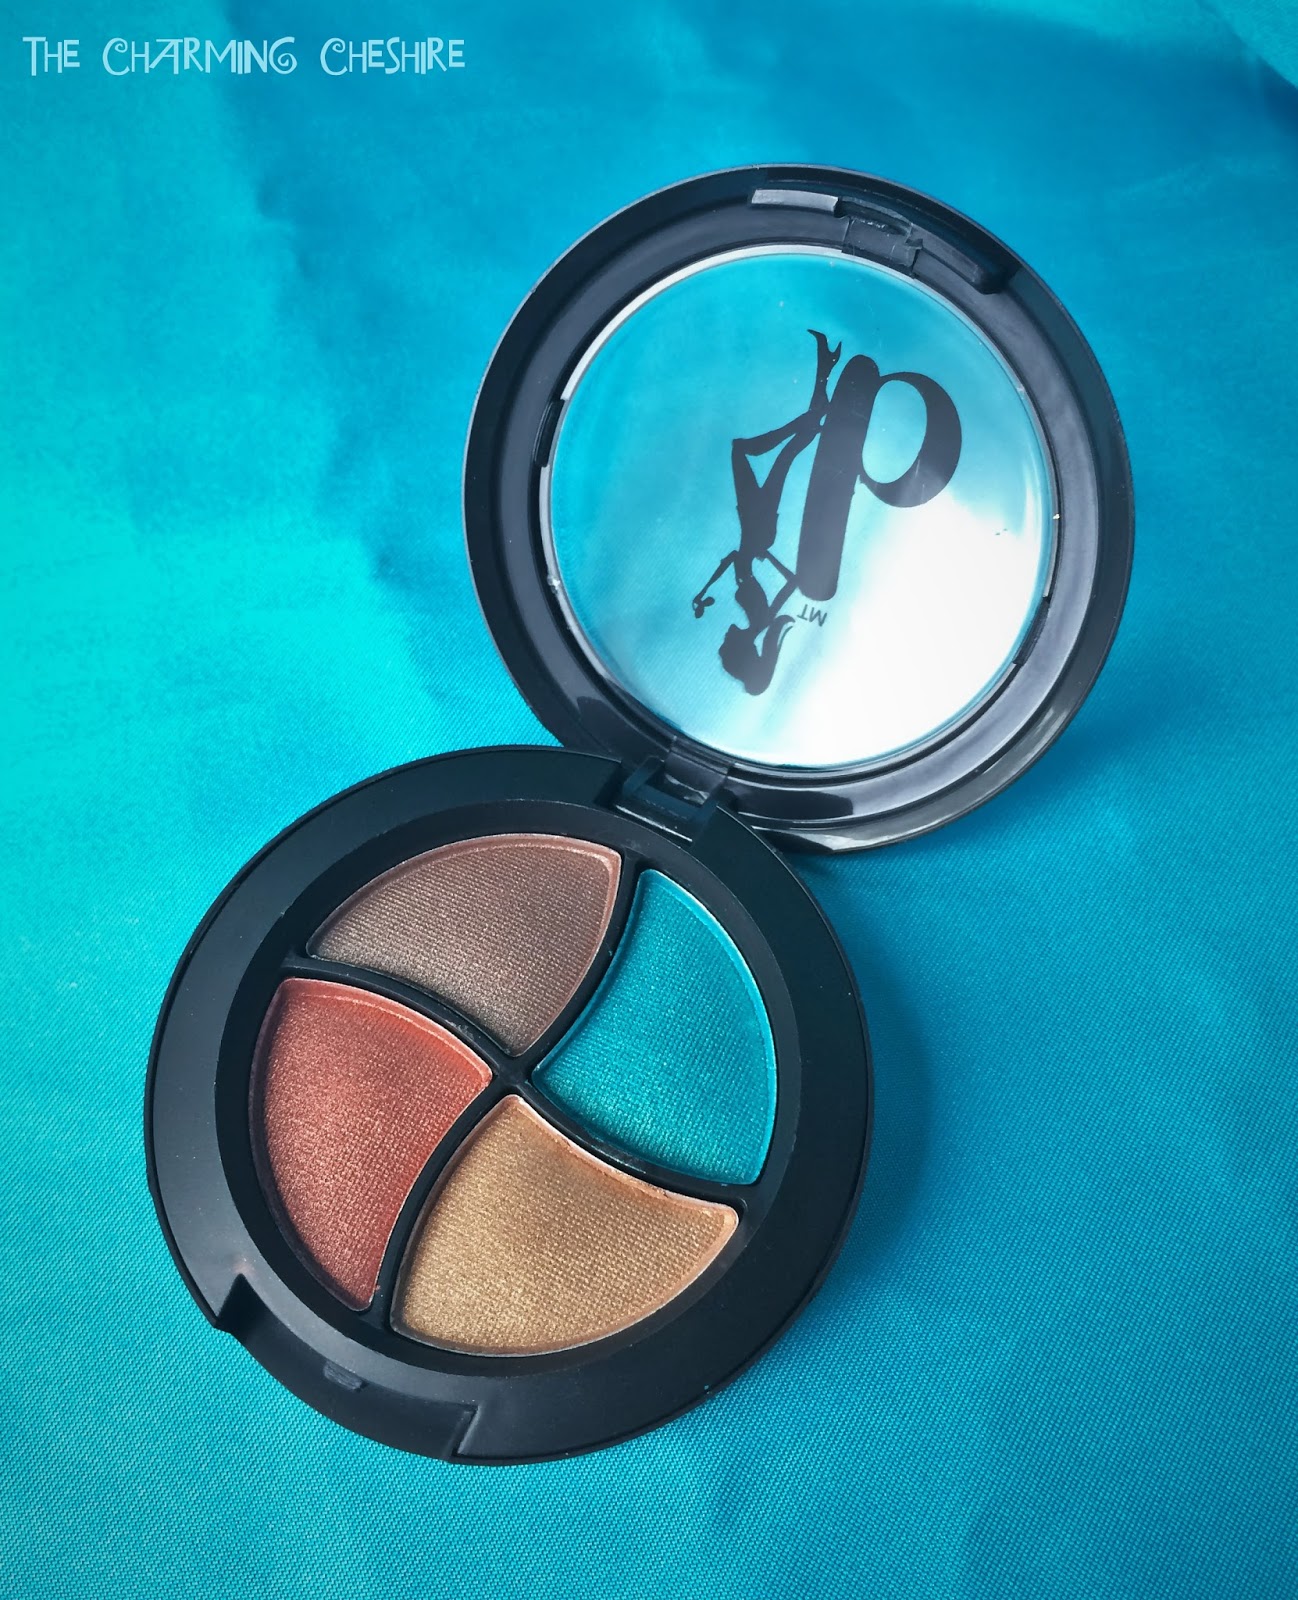
I'm
such a sucker for Be a Bombshell's packaging. I mean, really, how
gorgeous is this quad! The containers are fairly similar for their
blushes and shadows, a simple black matte snap shut case with a clear
top and their logo with the super cute silhouette of a girl leaning up
against a lower case "b". The inside has a slightly swirled divider with
the four shades. Each shade of their quads are actually available for
individual purchase as well, which I thought was so fabulous! The four
single shades in the Bora Bora quad are listed as:
- Starlet - shimmery chocolate brown
- Bora Bora - teal blue with a hint of shimmer
- Rock Bottom - burnt coral metallic copper with shimmer
- Risky Business - sandy brown shimmery golden brown
GORGEOUS close-up alert! ::sigh, drool::
The texture is very soft, smooth, not quite as rich as creamy as other
luxury shadows I've used, but definitely not at all chalky or powdery.
Like I said, very smooth and easy to use.
WITHOUT
PRIMER! ::dancedance, dancedance:: Pigmented shadows make me a happy,
happy gal. Look how stunning they are! I love them. This was about 2-3
blended swipes, and I mean....hello....hello....I can't...just
stare...at it's beauty....Shhhhhh....don't talk. Just look.
Ok, I guess I have to keep talking now ::giggles::.
The colors blend so easily, and are very pigmented. The aqua teal is so
pretty and vibrant and can easily be built up to be bright and vivid. I
think the coral-rust shade is my second favorite, it's stunning. I
really love the richness of the colors and the quality. You can easily
wear these very pigmented or blend them out for a lighter wash. The
blend like butter!
The
longevity of the shadows wasn't amazing, but they weren't too bad. With
primer and a setting spray I have full color for about 4-5 hours after
application, then it lightly started fading into a lighter color till
about the 8 hour mark, then it really became noticeable that it was
fading for the rest of the day. I didn't have any heavy smudging,
though, which is something very important for me when wearing vivid or
dark shadows.
You bet I'm going to be trying out some of their other quads! Here is what they currently have:
- Barcelona (dark navy, bright green, baby blue, plum)
- Madrid (chocolate, sandy brown, bone, sun-kissed coral)
- New York City (deep black, blue-green, shimmering pearl, silver)
WORTH AND PURCHASE:
1) Nicole by Opi Nail Lacquer Roughles in On What Grounds?:
- Full-size (0.5 fl oz) - $7.99
- I received a full-size!
2) Bare Minerals Marvelous Moxie Lipstick Mini in Get Ready:
- Full-size (0.12 oz) - $18
- I received a mini (0.05 oz) - $7.50
3) Pixi Beauty Mini Flawless Beauty Primer:
- Mini Flawless Size (0.4 oz) - $9
4) Be a Bombshell Eyeshadow Quad in Bora Bora:
- Full-size (one quad) (0.17 oz) - $16
- I received a full-size!
Total Paid for Bag: $10
Total Worth of Bag: $40.49
A
fantastic worth bag this month! Only four items, but still four times
what I paid, AND two full-sized products, and two awesome mini sizes
that weren't ridiculously small. Plus, this doesn't include the worth of
the bag, which to me is definitely worth something to me since it was
made from someone's work of art.
FINALE
I
have had WAY too much fun with my eyeshadow quad this week, I think
I've worn it pretty much every day since I received it. So I couldn't
decide between a couple of looks I did, therefore...I decided to share
them both! Some of the ladies from makeuptalk.com asked what different
ways could the quad be used...here's what I came up with...
Look #1
This look was inspired by the idea of taking a tropical vacation....heck, to Bora Bora, let's just say, for fun ::winkwink::
I wanted to evoke the feel of the ocean, so I concentrated the teal color underneath the eyes.
I
lightly dabbed on the Marvelous Moxie lipstick on my fingertip and
applied it from there to my lips instead of directly from the tube. I
wanted to give my lips some color but keep the focus mainly on the eyes.
I also used the Pixi Beauty Primer all over my face, then applied a
medium coverage BB cream over it as well as a light dusting of loose
mineral powder on my t-zone, however the glow doesn't pick up too much
in the photos. You can see a bit of it right below my eyes where the
light is hitting, and down the top of my nose.
For
the eyelids I blended the sandy brown shade above my crease, then the
chocolate brown right below that. Then I patted on the burnt coral-rust
shade all over my eyelid. I added just a teensy bit of the teal right
above my eyelashes on the inner 1/3 of my eyes just to balance out the
teal below it and frame the eyes a bit. I finished the look with some
dark brown mascara and dark brown eyeliner for a simple wing.
LOOK #2
Look two really was just more of me being obsessed about the teal! Haha!
I
wanted something bright and more colorful and pigmented for this look. I
used the Primer, once again, with a full-coverage foundation, and light
setting powder. For the lips I applied the lipstick directly this time,
for richer color. For the eyes I blended the burnt coral-rust in my
crease, lightly fading it up towards my eyebrows, then I blended on the
chocolate color on the outer half of my eyelids and outer half of my
bottom lashes as well. Then I patted the teal on the inner half of my
eyelids and lighted blended the sandy brown on the inner 1/3 of my
bottom lashes. The sandy brown looks very warm gold when blended
lightly, as you can see! I finished the eyes with dark black-brown
eyeliner for a wing and black mascara.
And
now for my super awkward and strange pose that shows you how much I
adore the eyeshadow quad and the Nicole by OPI Roughles in On What
Grounds? together!...
Ignore
the awkwardness...focus on the color...THE COLOR I SAY! I love that
aqua teal and turquoise together, they're so beautiful!
Well
that's it for this month's Ipsy Glam Bag review, I hope you enjoyed! I
can't wait to see what's in store for us for next month! Did you receive
a Glam Bag this month? What products did you love? Thinking of joining
Ipsy? Please feel free to use my referral code to sign up! Click HERE to start to subscription sign-up process!
Happy Makeuping and I hope you have/had/are having a fantastic Spring Break!


.png)