Tuesday, February 25, 2014

Julep - February 2014

THE DRAMATIC COLLECTION
UPGRADE SET (plus add-on)
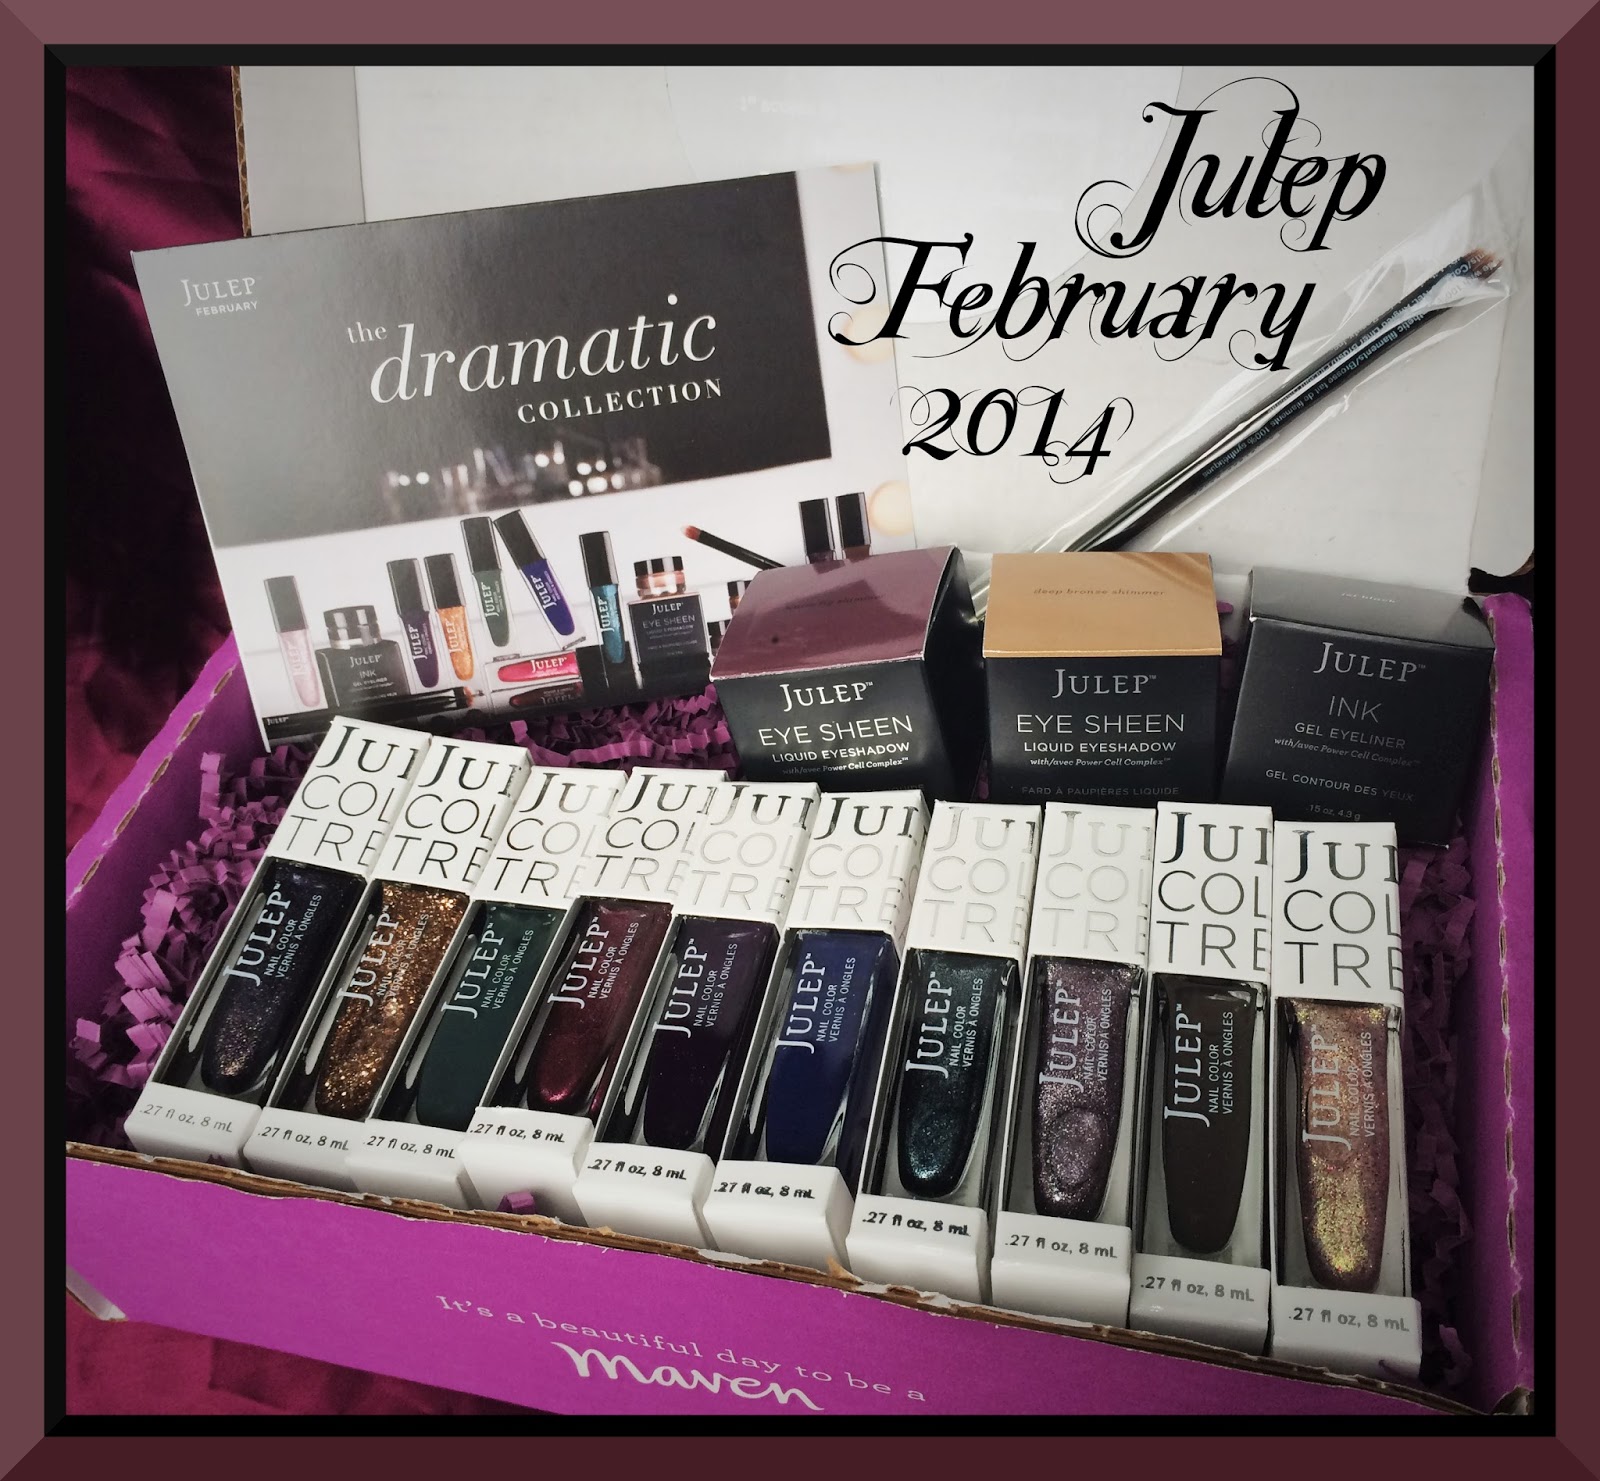

It's been a while since I've done a Julep post! My poor nails have been recuperating and now they're getting back in swatch shape! Hooray!

So heeeere is Julep's fabulous Dramatic Collection for the month of February! They now have three different types of upgrades you can select to add to the main profile choices for each month including a Polish Upgrade (all the polishes in the collection, no beauty products), regular Upgrade (all the polishes in the collection plus the main beauty product), or the Deluxe Upgrade (all the polishes plus all the beauty products). I chose the regular Upgrade for this month with a single add-on item.

Do you have a flare for the dramatic? If so, you may love this month's collection! Colors that are deep, rich and perfect for a night out on the town!

Here's the polish line-up:

 So pretty! I love the difference in vibrancy from brighter to darker as well as some shimmer and sparkle!


And now for each profile...


MODERN BEAUTY

EYE SHEEN
in Warm Fig


"This gorgeous liquid eyeshadow glides on easily and sets to a satin finish that stays put all day. The buildable, blendable formula is enriched with our proprietary Power Cell ComplexTM." - julep.com

These new Eye Sheens from Julep were the main beauty product that came with each profile as well. There are four color available:

  • Pale Nude
  • Dusty Taupe
  • Warm Fig
  • Bronze Shimmer

The color selection was customizable during the selection, so you could pick which one of the four shades you wanted, either for a single profile or an upgrade.


Warm Fig is a gorgeous pink-tinted brown with a slight bronze shimmer throughout. One thing that I was somewhat thrown off about with the product, though, is that on Julep's website it appears to look a bit thicker in consistency, similar to that of Maybelline's Color Tattoo Cream Eyeshadows but in person it looked very different. Here is what the product looks like on Julep's website:


Even the color is a bit different as well. On the website it's much pinker in tone, but in person it appears a bit more brown. As you can see from my photo the formula is bit more of a thick pudding consistency. However, when I turn the bottle upside down, it doesn't slide right out. Not that there being a difference in the photos is necessarily bad, but that is a big enough difference that some people might have been very disappointed. I always prefer a product be displayed in online photos as similarly to the actual product as possible, with little to no photoshopping. Especially in regards to color and consistency.


Now all that being said, I actually LOVE Warm Fig! It glides on super smooth and dries relatively quick, finishing in a solid base, but still with a gorgeous sheen. You can see it's easily blendable or can be worn thicker and more pigmented. The best way I found to apply is with a small concealer brush. I dab one side of the brush lightly in the sheen, then gently pat it on and blend out lightly with my fingertip. I blend it in fairly well that way I can build up the layers as I want instead of just applying big blobs on that could take forever to dry. I continue applying thin layers, letting each one dry before applying the next, till I'm satisfied with the result. One thing to note, once the product is fairly dry, if you try to apply a layer over it, you need to blend as little as possible...or as gently as possibly I could say. Once the base has set, it can lightly rub off if you blend over it too much. It won't rub completely off, but you'll see some patchiness. 

The smell is a bit unpleasant, though, it reminds me a bit of tar. Although, the longevity and wear definitely makes up for the weird aroma! With the thin layer application technique I used, my eye color and sheen lasted...oh....all day. Haha! Really, after 12+ hours only a teensy bit of sheen had lessened, and just the tiniest bit of product had creased, but only when looking closely in a mirror could you see it. When I wore it a couple of times I applied an eyeshadow primer, then about 4 thin layers of the Sheen, and used a setting spray to finish. I definitely recommend the setting spray as I went without it one day and did notice a bit more creasing.


INK GEL EYELINER
and ANGLED LINER BRUSH

 "This creamy jet-black eyeliner is packed with encapsulated pigments that deliver intense lines with a silky-smooth, smudge-proof finish." - julep.com

I've tried a variety of gel eyeliners but none of them have really impressed me yet so I don't use them often. I definitely was excited to try a new one out! You never know when you may find that magical product that just makes the sun shine, the flowers bloom and the birds sing!


The packaging is a standard gel eyeliner jar, with a twist-off cap. My only complaint with it is that the product is a teensy bit far down in the jar so you have to aim your brush fairly straight down, and I typically prefer to angle it a bit. I don't know why they couldn't have just made the jar a bit shorter or brought the product up higher. Once again, in this regard, I feel a little deceived by Julep's website photo. You can clearly see in their picture that the product comes all the way up to the top of the jar....

(from julep.com)

Not cool, Julep, not cool. That is a HUGE difference in quantity. This definitely makes me question whether or not I want to continue purchasing their beauty products. I've always been happy with their polishes, but their products have been iffy at times and when it looks like you're receiving a decent amount of product but you only receive about half....hmmmm.


Here is the brush:


I have several angled liner brushes that I've accumulated in brush packs, but it definitely never hurts to have more brushes!


The brush is a great size for applying eyeliner, however, I prefer mine to be a little bit smaller in size only because I like getting a very sharp, clean wing tip and when the brush is larger it's a bit trickier. This size is great, though, if you want a thicker cat eye or for a kitten eye.
    
    
Now I'm definitely sad I didn't receive more product in the jar, because this gel eyeliner is GOOOOORGEOUS, dahling, just GORGEOUS. It is blacker than black! Look how crisp and clean it stands out! Just to note, these swatches were applied with the Julep Angled Liner Brush. You can see the thin line isn't super thin, and although gel eyeliner formulas are thick, I've still been able to produce a super thin line with a thinner/smaller angled brush. You can also see the formula isn't too soft from the curve line, but that also means that it will last after application for quite some time. Speaking of....check out the line I wiped off! I did that about 10 seconds after applying...isn't that fantastic! It set right away! Love it. 

So longevity-wise, it lasted forever on my UPPER lashes. As long as it stayed dry, it stayed perfect and put all day long. However, I had also applied it under my bottom lashes (yes, you shall see later ::winkwink::) and that pretty much smudged off within an hour or two of wear. My eyes water so easily. Any little yawn, and I can produce tears. It's ridiculous I tell you. That's always such a bummer for me because applying any eyeliner on my bottom lashes is always so amazing for about 30 minutes, then it starts to smudge and I end up just using a q-tip (which I've learned to carry with me) to wipe it off. Yes, I've tried primers (a large variety), I've tried patting eyeshadow or powders over it to help set, all to no avail. It's just part of my daily beauty dilemma. We have have them! 

So, if you have any problems with watery eyes or eyeliners smudging, I'd say as long as you keep this on your upper eyelids, you'll have deep, rich, velvety black color ALL day with no problems! However, if you're lucky enough to never have problems with bottoms liner smudging, then you will ADORE this product! It has fantastic staying power, except it's not waterproof. It won't smudge, smear or flake off when dry!


BOHO GLAM - ROONEY & CAMERON


Rooney (left) - walnut bark creme
Cameron (right) - silver lilac stardust (matte glitter)

So here is the profile that I matched with when I first signed up and usually, I absolutely love the Boho Glam colors! Even though these seem a bit duller - especially for a Dramatic Collection - I still think they're lovely and look great paired together. 


Julep's Stardust finishes are similar to OPI's Liquid Sands. They have that rough, textured look and feel that can be worn without top coat for a textured finish or with it for a glossy shimmer/frost effect. 

Rooney appears much darker in person that it does on Julep's photos. The formula was a bit thinner for a creme, but it became opaque after two coats. I didn't have any problems with it being runny or streaking. Cameron, which I ADORE, dried super fast and barely even needed a second coat. The great thing about polishes like Liquid Sands, Stardust finishes, etc is that you really could get away with one coat if you had to. Especially if you're in a rush and need it to dry super fast, which they do. Cameron does spread very easily and in the photo above, I'm wearing two coats for full color and deep texture. I'm not wearing top coat in any of my photos so you can see the true finish of each polish. Rooney dries very glossy and Cameron, well, haha, has a gorgeous Stardust rough effect. 


BOMBSHELL - JUDI & KRISTEN


Judi (left) - English violet creme
Kristen (right) - deep sea teal with silver microshimmer

Oh my. Words cannot describe how much I LOVE this combo and how obsessed I am with Kristen. SO PRETTY! I think this is a great Bombshell combo, especially for a Dramatic Collection. The colors are rich, sexy and even though they're dark they have beautiful color.


Loooooook at this! Didn't I tell you they're stunning together? I'm really happy that Julep produced an actual dark purple color as opposed to a dark purple that shows up black but lightly purple around the edge color, as they've done that sort of thing before. These photos are taken in filtered indirect sunlight (a white curtain over the window) so they're not super bright. IN direct sunlight it appears much more purple. Regardless, Judi is beautiful and has a very glossy finish. For it's formula it was a bit thinner for a creme as well (like Rooney) but it easily became opaque with two coats and I had no problems with it being runny or major streaking.

Kristen...::sigh::....is amazing. If I was a mermaid...I would wear this polish. It was opaque with ONE coat, however I went ahead and applied two for the photo. It spread like an absolute dream and why haven't you bought it yet? The finish is a bit more like a satin with very subtle gloss, but with a top coat, the shimmer comes out more. Be still my Kristen-loving heart.


CLASSIC WITH A TWIST - OCTAVIA & GRETA


Octavia (left) - smoky indigo creme
Greta (right) - loganberry multidimensional microglitter

I'm so happy to see the Classic With a Twist profile showing off some bright fun colors instead of reds and nudes! This profile was really the whole reason I decided to go for the Upgrade instead of picking just one profile. 

 
Although I'm obsessed with the Bombshell combo, I feel like this is a close second! The colors remind me a berries! Octavia has the same formula as the other cremes - Rooney and Judi - a bit thinner for a creme, but very smooth upon application and with a very glossy finish. It glided on like a dream and I had no problems with it streaking or running. It also barely needed a second coat. Greta is fairly thin with a single coat, it definitely needed two for full coverage with no streaks and a strong vivid color. The finish is a teeeeeensy bit streaky, but not much. You can see it more on my pointer finger than my pinky, since for some reason it went on a bit thinner on my pinky. The streaks are very visible though. The shimmer shows up just as well on the nail as it does in the bottle, which I love! The formula was easy to work with as well. I think it's a very flattering shade! But seriously....I have tasty raspberry and blueberry fingertips! ::smacks lips::


IT GIRL - DIAMOND THEORY, GLAM ROC & ROC SOLID


Diamond Theory (left) - full-coverage multidimensional copper glitter
Glam Roc (center) - midnight purple and gold stardust (matte glitter)
Roc Solid (right) - vintage military creme

This trio was a selection of colors that I only felt so-so about when I first saw them online but once I swatched them I thought they were fantastic! According to Julep's website, they're curated and named by Jay-Z's Roc Nation, which is a "full-service entertainment company, inclusive of artist, songwriter, producer and engineer management; music publishing; touring & merchandising; film & television; new business ventures; and a music label." (rocnation.com). I think the color choices are fabulous! If you think about the music and entertainment industry and check out the celebrities, singers, artists that are associated with Roc Nation, you can totally see how these colors are the perfect choices!
  

Couldn't you just die? LOVE! I think Glam Roc is one of my all-time favorite Liquid Sand/Stardust/Textured finished polishes, although it is a possibly near perfect dupe for OPI's Alcatraz...Rocks. Alcatraz...Rocks is just a teensy bit more purple in shimmer, but barely by much. You have to study them super close to notice it. I really don't have anything like Roc Solid and Diamond Theory though! I'm really impressed with all the cremes in this collection, they all have similar finishes, again, that of a thinner creme that spreads easily without being runny or streaky and are perfectly opaque in two coats, barely needing it. All with an extremely glossy finish and all evening themselves out well. As far as Diamond Theory, I know it says that it's supposed to be a copper glitter but to me it leans more gold than straight up copper. Here's a close-up of it:


This is with two coats, which it definitely need for full coverage, but I love how well it covers! The glitter spreads super well and doesn't become overly clumpy in any spots. There's the perfect mix of small glitter dots and larger hexagonal glitters. Packed, glamorous and fabulous!
  

Here's a close-up of Glam Roc. I LOVE THIS. I love the subtle purple sparkle all over, however the gold doesn't show up quite as well on the nail as it does in the bottle. Don't care...it's fabulous. It does show up a teensy bit better with a topcoat, though. It applies wonderfully, is almost opaque with a single coat, but I applied two for the photos. The Stardust finishes are a bit harder to remove, I actually like soaking them a bit in polish remover to soften the formula, rather than try to wipe it off quickly.


FEATURED ADD-ON:

EYE SHEEN
in Bronze Shimmer
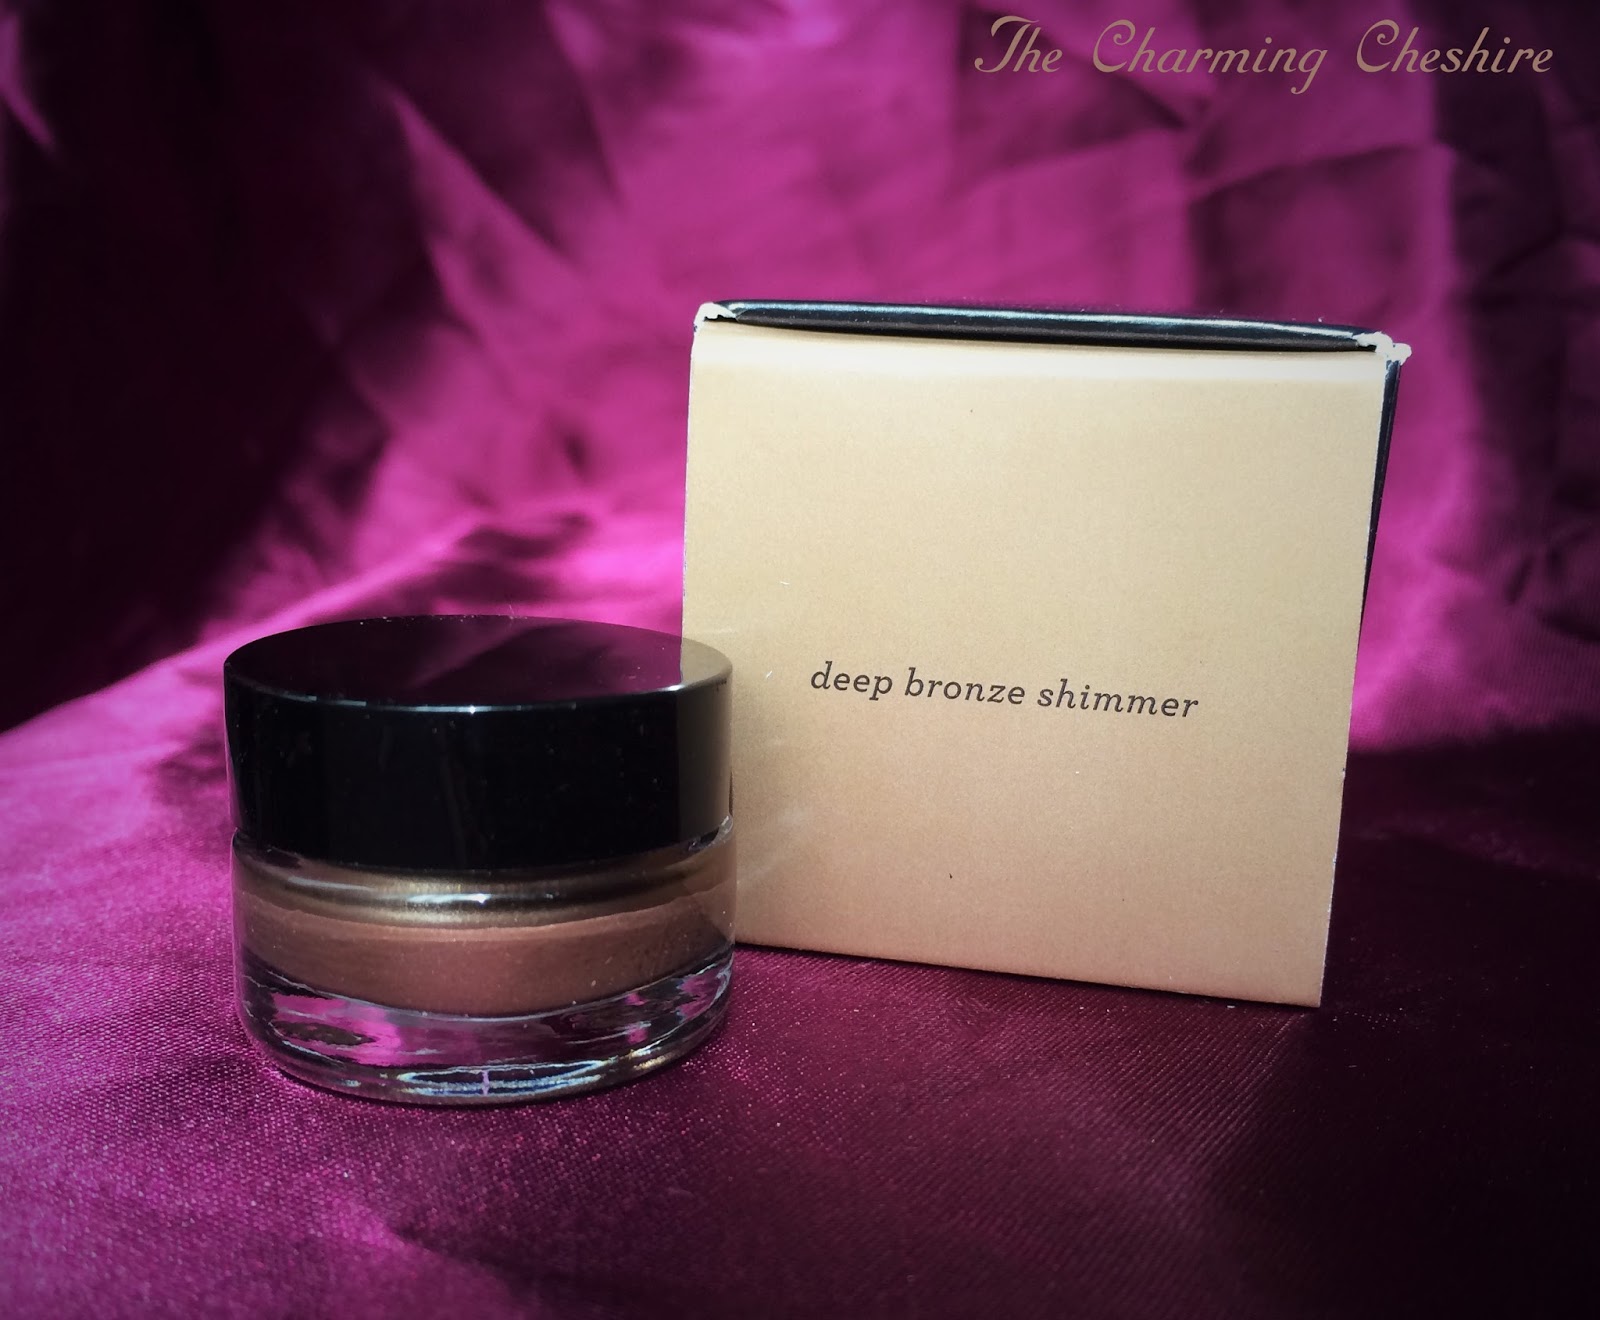

Haha, I chose this Eye Sheen as an add-on because honestly, I couldn't decide between it and the Warm Fig!
   

Again, a thicker liquid pudding type of consistency, although Bronze Shimmer is PACKED with...well...SHIMMER!


Ok....if I was a bronze goddess...haha, actually some friends of mine and I were discussing dressing up as Roman or Greek goddesses for a Renaissance Festival and one would go as a Golden statue, another as a Bronze statue and I would be the Silver. I need a bigger jar of this for the Bronze goddess because woooooooooow...this stuff is gorgeous!

Compared to Warm Fig, the bronze shade is more consistent whether blended or swiped on thick, just a slight change in tone. It's also more of an all-over sheen than packed with shimmer that stands out more when blended, however there is definitely some gorgeous shimmer in the sunlight.

The longevity and wear is exactly like Warm Figs. It stayed on all day with very little creasing. The Bronze Shimmer was a teensy bit trickier to blend multiple layers, it did wipe off a bit quicker underneath so I had to work faster while it was still slightly tacky but set enough. However, the color was a bit more pigmented to begin with compared to Warm Fig, so I didn't need to add multiple layers as much!


BONUS:

Julep Nail Polish
in Love


Love - gold, pearl and fuchsia microglitter

This was the absolutely stunning Valentine's gift that came in every Julep box, whether you picked an individual profile or an upgrade. OH myyyyyyyyyy. Best Valentine's present ever! ::drool:: I positively love (hehe, Love) microglitters such as this. I love the gold against the fuchsia, although the fuchsia comes off a bit more red to me. I actually thought it was red at first (very Valentinesy)! The coverage is great, although I think it needs three coats for full opacity. This picture shows two, and if you look closely you can somewhat see my nail line. The finish isn't too glossy but very shimmery! Look how pretty the gold picks up in the light! Magical!


WORTH AND PURCHASE:

1) Eye Sheen in Warm Fig (.15 oz) - $18 (or $14.40 for Mavens)

2) Eye Sheen in Bronze Shimmer (.15 oz) - $18 (or $14.40 for Mavens)

3) Ink Gel Eyeliner (.15 oz) - $22 ($17.60 for Mavens)

4) Angled Liner Brush - $18 ($14.40 for Mavens)

5) Nail Polish - $14 ($11.20 for Mavens) x 10 polishes = $140 ($112 for Mavens)


Total Paid for Box: $66.98*

Total Worth of Box:  $216 (or $172.80 for Mavens)


Breakdown: $19.99 for main subscription, plus $35 for Upgrade plus $11.99 for extra Eye Sheen. IIIIIIIIII don't know if I'd pay near $20 for a single angled eyeliner brush. That's a little ridiculous if you ask me. I also don't think those little jars are worth near $20, especially for only .15 oz each. I love the blacker than black gel eyeliner because the velvety color is amazing, and I even love the shimmer of the Sheens, but $20 is pretty darn expensive! Although at first glance it seems like I got a great deal compared to the original price I paid, I just don't feel like it was quite worth near $70, especially for the sizes. 


FINALE

So of course I needed a dramatic eye, am I right? This IS the Dramatic Collection! Haha! I didn't go too full-on dramatic, but definitely with a flare...

   
I did use both the Warm Fig and Bronze Shimmer and of course the Ink Gel Eyeliner for some sharp lines!

  
I blended it the Warm Fig over my eyelid about 2/3 of the way across, then blended in some Bronze Shimmer on the outer 1/3 of my eye. I used a bit of the Bronze Shimmer on my waterline as well to add some subtle shine, but blended in alongside the Warm Fig, the Bronze Shimmer ended up looking a bit muddy looking. Harumph. I mean, I do love the deep, romantic effect they have together, but I was hoping for a bit more bronze. I used the Gel eyeliner for a long winged out cat eye then used it on my bottom lash line for a shorter bottom wing to line up with the top. My apologies if the photos are great quality, it was super dark and rainy outside so I had a hard time taking bright, crisper pictures. That could also be why the Bronze Shimmer isn't showing up as well either. My poor little iPhone doesn't take good pics in darker light! 


Well that's it for this month's Julep subscription box! March's Selection Window is already closed, so I can't wait till my box ships! At this time I've decided to stop with the Julep REVEAL Sneak Peek posts for each month since they didn't seem to get a big response, however, I'd love ya'lls input on that. Would you like me to start them up again or would you prefer I just stick to posting the goodies once I receive them?


Happy Dramatic Makeuping and Polishing!


Friday, February 21, 2014

Beauty Spotlight - Ft. Flower Beauty

FLOWER BEAUTY


"You no longer have to spend a lot of money to get the quality cosmetics you want and deserve.
How do we do it? We do not pay for advertising. Where other beauty brands spend a vast percentage of the cost of their products on ads, we do not. Drew, as an owner of the brand, takes pride in promoting Flower, which in turn allows us to put all of our resources into the formulas and packaging, and not into advertising.

Custom-formulated with the same ingredients used in luxury make-up, our exclusive botanical-infused Soft-Focus Complex illuminates for a lit-from-within effect.
All products are proudly made in the USA and are never tested on animals.

So be em-FLOWER-ed. The best make-up isn’t only found in high-end stores any longer." 


First of all, you may have noticed a renaming for my Fun Little Purchase post....it's now Beauty Spotlight! Haha, I realized that not ALL of the things I had been purchasing were really falling into the category of "little", and I think this new name suits this type of post so much better! So! I have been DYING to try out this brand since it first came out at the beginning of 2013. My store FINALLY is stocking it, I had been looking everywhere for it for...literally, over a year. 

The brand was launched by American actress, screenwriter and model, Drew Barrymore and was made with the purpose of offering high end quality makeup for an affordable price. Here's what Drew has to say about her brand:

"The reason I have created this makeup line is because I have grown up in a makeup chair. I loved watching women in this aspirational environment. But it was an always will be important to me to send messages of empowerment.

And on a business level, I wanted to give women the finest formulas. They deserve to have that level of quality, and I wanted to be the brand that delivers that to them." - Drew Barrymore, Flower Beauty

Well, Drew, I quite agree and I love your attitude! I've always loved her as an actress, and now I'm super excited for her in this next step in her career. 

Flower Beauty is an exclusive brand to Walmart and walmart.com. Price-wise the line ranges from the cheapest item being $4.98 (MSRP) for Nail Polish to $13.98 (MSRP) for Foundation. The average price is around $7 for majority of items. As for what's available...well pretty much everything you could possibly need in makeup as well as nail polishes. Here is a list of what they currently offer:


  • About Face Foundation (14 shades)
  • Skincognito Stick Foundation (8 shades)
  • In Your Primer Perfecting Primer
  • Face the World Tinted Moisturizer (5 shades)
  • BB Cream 4-in-1 Skin Solution (4 shades)
  • Lighten Up! Illuminating Concealer (4 shades)
  • Petite Fleurs Pocket Triplet Concealer (2 selections)
  • Secret Service Cover-Up (4 shades)
  • Powder Up Loose Powder (3 shades)
  • Powder Trip Powder Foundation (4 shades)
  • Win Some, Rouge Some Creme Blush (6 shades)
  • Glow Baby Glow Blush/Bronze Duo (4 shades)
  • Glisten Up! Highlighting Chubby (3 shades)
  • Perfect Canvas Creme Foundation (4 shades)
  • Shadow Play Eyeshadow Quad (6 selections)
  • Color Play Creme Eyeshadow (12 shades)
  • Extreme Measures Lengthening Mascara (5 shades)
  • Lash Knockout Volumizing Mascara (5 shades)
  • Zoom-In Ultimate Mascara (5 shades)
  • On Your Mark Liquid Eye Liner (2 shades)
  • Easy on the Eyes Long Lasting Eye Pencil (5 shades)
  • Raise Some 'Brows Defining Brow Pencil (3 shades)
  • Eyes on the Prize Eyeshadow Chubby (5 shades)
  • Eye 2 Eye Eye Marker and Volumizing Mascara (2 shades)
  • Double Take Eye Marker and Creme Shadow (3 shades)
  • Kiss Stick Velvet Lip Color (9 shades)
  • Kiss Stick High-Shine Lip Color (9 shades)
  • Lip Service Lip Butter (9 shades)
  • Shine On Lip Gloss Wand (10 shades)
  • Sheer Up Lip Tint (5 shades)
  • Line & Shine Lip Liner (5 shades)
  • Kiss Me Twice Lip & Cheek Chubby (5 shades)
  • Lip Suede Velvet Lip Chubby (5 shades)
  • Petite Fleurs Pocket Triplets (4 selections)
  • Nail'd It Nail Lacquer (24 shades)


Whew! That's a lot of goodies! Aren't the names adorable? I love cute little catchy product names. Well, I know you're just itching to see what I purchased for reviewing, so I won't keep you waiting any longer!....On to the review...


BB CREAM
4-in-1 Skin Solution
in BB1


"Use daily to eliminate skin dullness
Covers imperfections and discolorations
Softens and smoothes skin
Eliminates unwanted shine" - flowerbeauty.com

I'm definitely more of a BB Cream girl than a foundation girl, and it's been forever and a day since I've decided to try out a new one. You know how you just get stuck loving a single product and refuse to try something new? Yup, that's been me for months. I went through several tubes of my favorite BB Cream without even considering venturing out into the great BB beyond. Well, no more! When I saw Flower Beauty offered a BB Cream, I just knew it was fate and I had to try it.


The packaging is a standard tube for BB creams - long, flat with  a twist-off cap. First of all, I have to say, BRAVA to Flower Beauty for their packaging. The rose gold is GORGEOUS and I love the clean, simple designs with white. It feels very fresh, feminine and yes....flowery! I feel like if a garden were to suddenly magically grow makeup products, this is what they'd look like. (Go on, go imagine that if you will. It will make any makeup obsessed lover's day).
  

I LOVE LOVE LOVE this formula! It has now become my new favorite BB cream and I use it every single day! It's a bit thicker than the typical American BB cream, in fact it reminds me a bit more of Asian BB creams. In similarities it is pretty much a thick full-coverage cream, but it lacks the dewy finish that most Asian BB creams have.


There's only four shades of BB creams available from Flower Beauty at this time - BB1 (Fair), BB2 (Light), BB3 (Medium), BB4 (Dark), and of course I picked up Fair. Fair leans just a taaaaad yellow on my peaches and cream Irish skin, but once it's blended out it's not as noticeable. I always make sure to pull it down onto my neck so there won't be any strong contrast, however it can look more natural when applied right. I do wish they'd come out with a slightly pinker toned version of the Fair, though.

As far as application methods, I've tried several:

1) Applying with hands - This is my least favorite method, only because it IS so thick. Even if you apply slow with small amounts, you are layering it on a bit and it will start to look heavy during the day after hours of wear. Even though the formula blends well, it's a bit trickier to get a completely even application just from using fingertips.

2) Applying with a brush - This is a fairly good method for application, I really didn't have many problems with it. I tried a variety of brushes and the one I felt was best was my Real Techniques Expert Face Brush. It was easy to control the blending since the brush isn't huge but still large enough to cover a decent amount of skin so applying did take too long. I also tried applying the cream to the back of my hand and swirling the brush it in as well as dabbing the cream in spots all over my face, THEN using the brush to spread. Both methods worked well, however I preferred the latter a bit more.

3) Applying with a Beautyblender - My ABSOLUTE favorite method, it works like a DREAM. If you don't have a Beautyblender, but wan't to try out this BB cream, I really do recommend getting the blender as well, you won't be disappointed. It gave me an absolutely flawless airbrushed finish! I wet the blender under the faucet, then used a paper towel to gently squeeze the excess water out, leaving the blender slightly damp. Then I applied some of the BB cream to the back of my hand, dabbed the blender in it and stippled it all over my face. It ever so slightly thins out the BB cream, but still overs great coverage and once that layers dries after a minute you can add more for better coverage if needed! ADORE.

The finish when used without the Beautyblender is somewhat dry, with a slightly powdery look but not a powdery feel. It's best not to brush on a very dry looking setting powder over it, though, however you can still use one with it. With the Beautyblender, it's a bit more dewy during application, but will dry slightly once it sets. Used this way you can pretty much use any setting powder with it.
  
As for longevity and wear, paired with a primer and setting spray, the coverage lasted 8+ hours. Because it's a bit thicker, however, if you don't blend it well you will start to see your skin underneath in some spots if it wears off. When I applied it with my hands, I had this problem, especially since I have rosacea and if I don't blend my BB cream or foundation well you'll see the rosacea peeking through some streaks or spots on my face where the coverage has worn off. I rarely had that problem using a brush to apply, though, and I never had it when using the Beautyblender.


I'm hoping they may add more shades to the line, though, possibly in cool or warm tones for each shade, since I know that would be helpful to such a huge range of people, including myself. I think if they did that this BB cream would be one the best available in America for such a great price!


SHADOW PLAY
EYESHADOW QUAD
in EQ6 Secret Garden


"Smooth and brighten delicate eyelids
Color blends evenly and flawlessly with a luminous finish
Ginko Biloba extract makes lids soft & supple" - flowerbeauty.com

Oh you know I HAD to get some eyeshadows! This little quad was calling my name, isn't it stunning? They have six shade selections for this quad that includes:


  • Face the Gray - grey, taupe, lavender, dark purple
  • Foxy Browns - peach, browns and taupe
  • Secret Garden - teal, green, rose and peach
  • Smoke and Mirrors - grey, nude, taupe and mink
  • Twilight Moon - cream, grey, dark grey, black
  • Blue Lagoon - cream, light blue, teal, dark brown
   
I do hope they come out with more, but so far, I love the color selections!


Again, super cute packaging that's crisp and white with rose gold trim. It's a standard quad compact shape, but it indents in in the center of each side, as well as bubbling in on the top of the plastic cover. I think it's adorably similar to a flower shape! Which, I'm sure, is exactly what they were going for. Well done, Flower Beauty!


Inside are the four shadows, nicely separated by the trim, as well as a dual-ended shadow applicator. The only thing that this compact does NOT have is a mirror, however, I'm fine sacrificing that for the sake of adorableness. ::giggles::
   

I was SO shocked at the pigmentation of these shadows! These swatches were taken WITHOUT primer. Hello! Each swatch was about 2-3 swipes each. The pale peachy-nude is a great highlighter color for my skin since it stands out well enough but can be blended for just subtle shimmer. The rose tone has some light flecks of silver shimmer in it, but it's not overwhelming, while the dark green-teal and light moss green have a beautiful satin finish. I didn't have any problems with patchiness or dryness and the blend beautifully.

I always use a primer as well as setting spray with the eyes as well so with it, the colors lasted about 7 hours before fading. The pale peachy-nude was the first to fade away, of course, but the greens stayed fairly vivid till about the 9 hour mark.

I really want to try the other quads now! I would love it if they came out with a pink or pastel quad.


ZOOM-IN
ULTIMATE MASCARA
in UM1 Intense Black


"First at Mass, adjustable brush lets you customize lash volume and length
Lashes appear dramatically longer, fuller & defined
D-panthenol to smooth lashes & stimulate growth
Rice wax for smudge-proof color" - flowerbeauty.com

Alright my darlin' readers...you may already be tired of me saying how amazing everything is already...but hold on to your hats...this is now my HOLY GRAIL mascara!

When I went through their mascaras and saw Lengthening, Volumizing then Zoom-In Ultimate 3-in-1 Mascara of course I was like....GIVE ME THE SUPER FANCY ONE! Especially with the slender rose gold packaging!

This mascara comes in five different shades: Intense Black, Black, Brown Black, Brown and Waterproof Intense Black.

(click image for larger view)

So I have actually heard of twistable mascara wands before but I had never tried one. Although, I don't recall seeing one that twists THREE clicks before. In this photo it shows the actual part of the mascara tube (the cap) you turn to adjust the wand and twist it.

Step 1 - Lengthen


The wand is super long for the first step! It's nearly as long as my eye, haha! The bristles are spaced well apart and are what I call "toothy" plastic bristles. They're not incredibly long so I'm not hitting my eyelid with them while applying and smearing mascara on my eyelid, but they're long enough to reach well through the lash for a good coat.


Step 2 - Curl


Once you're done with step one, you twist the top of the applicator wand cap to pull in the bottom of the bristles which curl them for step two. As you can see, the top part of the bristles have rotated around, giving the overall bristles a big curve. I know you may be thinking...how can this possibly just CURL the lashes? I'm telling you...it does. It just pushes those little lashes up and makes them look happy!


Step 3 - Volumize


Another twist and click into place and voila, super curvy bristles! After the last twist the center to bottom part of the wand twists creating a swirled brush that's more tightly packed to deliver some fabulous volume and plumping.


So here I swiped across twice in each mode so you can see the difference in the bristle structure. With Lengthen (step 1) there's a definite separation in the bristles, along for separation in lashes and an even coverage. Curl (step 2) doesn't show much of a difference but I'm sure that has to do with the actual curvature of the brush itself, that causes some push and lift of the lashes. Volumize (step 3) shows a tighter and thicker coat that adds some serious volume and strong layering compared to the extended wand.

This mascara layers very easily with little to no clumping if layered while still lightly tacky. It's always best not to layer over completely dried mascara as that can typically get too heavy and create thick blobs that don't adhere as well or will easily flake off once dried. Even with each step, I'll go over the lashes a few times to ensure complete coverage. For my bottom lashes, however, I only add a light layer of each step.

This mascara has awesome wear! My lashes stayed lengthened, curled and volumized for...well....all day. I kid you not! They were just stuck looking fabulous until I took my makeup off! The formula does not smudge at all, but after hours of wear if you touch your lashes, you may have a teensy bit of flaking, but I found if I didn't mess with them, I didn't have that problem at all. I'd really much rather have a few flakes than smudging. 

Yes, I am obsessed with it, in fact, I've already purchased the Brown shade as well since I made this original purchase. My little short and finicky lashes just LOVE this stuff! I'm curious as to if there'd be any flaking with the waterproof formula, but I'm not a huge fan of waterproof formulas since they're usually so hard to take off. The regular formula isn't hard to remove at all, even though it lasts so long.


WIN SOME, ROUGE SOME
CREME BLUSH
in Peach Blossom


"Conforms to skin for a soft “powder”-like finish
Blush transforms into a soft velvet veil on cheeks
Deposits gentle color for a healthy glow
Perfect for layering to build your desired look" - flowerbeauty.com

I have so many more powder blushes than cremes, so when I saw this product I knew I had to try it out. I mean, how ridiculously adorable is this little thing?


I was torn between this coral shade and a gorgeous vibrant pink, but I absolutely loved a shade of lipstick that I'll show you later in this post, so I got the blush to go with it. Again, super cute white packaging with rose gold trim! The top of the lid is fairly thick and domed slightly which gives a bit of a magnifying effect when viewing the blush.


The compact isn't too large, in fact, the blush pan is about the size of a quarter, which makes it great for tossing in your purse for color touch ups in the day. One thing I'll say for it's size, though, is if you prefer using a brush for creme blush application, the blush will smear a bit on the rose gold trim around the side of the pan. If you're particular about keeping your products clean looking then I found the best way to use a brush without having to dip it directly into the pan (which isn't too good for your blush incidentally, since you could get hairs, and bristle marks all in it) is to swirl a clean finger in it and wipe it ONTO the bottom of your brush bristles, THEN apply to the cheeks. Of course, you can also just apply directly to the cheeks with your fingers!


I LOVE this color! It's a gorgeous peachy-coral that is very buildable for pigmentation or can be worn more naturally for a colorful flush. The formula is very smooth and creamy and blends out evenly and smoothly. Blended out it just looks like a soft flush that's very natural looking. It does set it fairly quickly so you can add more as wanted without smearing off what you already have on. It stays somewhat soft with it's finish, it doesn't set to a powder but it does last for hours and hours (with primer and setting spray) before gently fading away. I'd say mine has been lasting consistently about 6-7 hours before fading.

The other colors this creme comes in are: 
     
  • Elegant Azalea - rosy red-pink
  • Forget-Me-Not - light pink coral
  • Primrose & Proper - medium pink
  • Pure Petunia - bright pink coral
  • Rose-o-den-dron - light mocha pink


GLISTEN UP!
HIGHLIGHTER CHUBBY
in HL1 Pearl Shimmer

 
"Sheer, illuminating highlighter with a long-lasting glow!
Perfectly brighten and accent cheekbones and eyes, including brow bone
Blends seamlessly into a subtle glow or true frosted shine!
Silky formula provides a brightening effect and luxurious finish
Use over makeup or alone for a natural glow" - flowerbeauty.com

Haha, I just thought the chubby sticks were so cute! They have different ones for highlighting, eyeshadow, lip & cheek and velvet lip, but since I wanted to give a full-range overview of their line, I decided to go for the highlighter, especially since I've never tried a highlighter stick quite like this before.


The packaging is pretty simple. The stick shows the color of what the product is, and the white part at the bottom is twistable to push up the product inside. The rose gold is present in the lettering font instead of trim.


Now HERE is my one and only major issue with this brand and it's packaging. There is, of course, a product sku sticker on each piece and this sticker was placed OVER where the bottom of the chubby twists and up to above the middle of the stick. I had to take the sticker off to twist it. Once I took it off, you see what is left....yucky stickiness! This is AFTER I tried rubbing it some to remove it. I'm probably going to have to get a wipe and some sticker remover to take the rest of it off. This also happened with my BB cream and lipstick, but this highlighter is being particular difficult. I don't like that I HAD to remove the sticker to twist the product up, especially since the entire product did have plastic on it to prevent people from opening it. It's not a HUGE deal, but still worth mentioning.


Come to think of it, I actually do have ONE more complaint with this highlighter. The amount of product inside. You look at the stick and you think, wow, that's quite a bit of product....then you twist it all the way up and....nope...not even half the length of the stick. ::le sigh:: I'm not a fan of deceptive packaging and we all know it happens A LOT in the beauty world, so this did make me frown a bit. However, with that being said, after use, I can tell this product WILL last quite some time as a little goes a long way...I just wish, like I said, the packaging wasn't so deceptive as to how much product you're getting.


There are three different shades for the highlighters, first of all, this one - Pearl Shimmer, which is a pink-toned nude shimmer, then there's also Gold Coaster, a light yellow-gold shimmer, and Honey Bronze, a honey-nude shimmer.

It's fairly sheer for a highlighter with some subtle shimmer and frostiness. It can be built up to some extent but mostly it goes on very lightly. The Pearl Shimmer shade almost matches my skin tone perfectly so I can pretty much use it anywhere on my face I just want more light to hit for a brightened glow. I just swipe it straight on, then lightly blend it with my fingers!

Longevity and wear isn't quite as long as I would like, but still not bad for a sheerer highlighter. I had about 3 hours of glow, then at the 4-5 hour mark it began to fade a bit. I still had a bit of shimmer under direct bright light at the 7 hour mark, though.

I'm actually very curious to try the other two shades since Pearl Shimmer matches my skin so much! I want to see if they'd show up more or create some shimmery tone!


KISS STICK
VELVET LIP COLOR
in LS7 So Gladiola

 
"Emollient oils improve shine for a rich, creamy application
Pure, intense color payoff" - flowerbeauty.com

Gotta get a lippy! There were some gorgeous shades to pick from but of course my eye jumped to one of the brighter ones! Here are the colors they currently offer for the Velvet finish:

  • Set Me Freesia - warm pink nude
  • Petal Kiss - warm rosy pink
  • Tender Tuberose - deep rose with brown undertones
  • Chocolate Lily - dark rosy brown
  • Dahlia Dahling - bright red with fuchsia undertones
  • Camelia Charm - light to medium pink
  • So Gladiola - medium peachy orange
  • Get to the Poinsettia - bittersweet bright red
  • Flamingo Flower - cool toned bright fuschia


They have three different types of finishes for their lipsticks - Velvet (matte), High-Shine and Butter (more sheer). This is from the matte range and as you can see, it has very little shine at all. It's not COMPLETELY matte but it is quite drying. However, the color is SO pretty and can be worn super bright for full pigmentation or blended out. Even though it's a matte finish, it's still easily blendable. 

The main issue with this lipstick is the formula. It just is a little too dry after long periods of wear. For best application I've learned to apply a little chapstick that is very deep conditioner and won't slide off my lips or smudge and blend it in lightly with my fingertips. THEN I apply this lipstick over it. If you have any cracks or creases in your lips, this lipstick will show it. It does pull slightly on your lips as well after a few hours so you feel like you either need to reapply or blot/wipe a bit off to look even again. I even found that applying a bit of chapstick or balm on your fingertip and lightly wiping over lipstick that was applied hours ago does help freshen it up a bit. 

As much as I love the pigmentation and immediate finish, I do think I'd like the High-Shine line better. I've heard that So Gladiola is one of the best of the Velvet lipsticks after I purchased it, and that the other's formula's are even more drying. If you're looking to try out a lipstick from Flower Beauty, I might recommend the High-Shine or Butter ones instead, unless you don't mind putting in a little extra work for that Velvety finish and color.

As far as longevity is concerned, the color (although dry and pulling a bit) does last! I have full, bright color for about 4-5 hours after wear, then some faded color for a couple hours after. So longevity gets an A+, but finish...not so much. I am going to be picking up a few in the High-Shine and Butter finishes, though!


NAIL'D IT
NAIL LACQUER
in NP9 Eye of the Tiger Lily and NP8 Good Bud-dy


"Long-lasting
Vibrant classic and on-trend 3-FREE (free of DBP, toluene & camphor)
Non-Chipping Immaculate (or Incredible) Formula" - flowerbeauty.com

Aaaaand the last of the Flower Beauty products I have to show you today are two of their Nail Lacquers! Of course, I couldn't just pick ONE, now could I? ::winkwink::


The two that I chose were....do I even need to say it?....two of the brightest ones they had. I just wanted something fun and eye-catching for Spring! I chose Good Bud-dy, a teal blue, and Eye of the Tiger Lily, a bright light orange. The bottles are a thick glass with a glossy white top. The brush itself is a standard polish brush size. These are one of the few Flower items that doesn't have any rose gold trim or lettering on them anywhere.


Here I applied each other with two coats each, no topcoat. You can see they both have a pretty glossy finish by themselves, however, there's a definite difference in opacity. Good Bud-dy was pretty much opaque with one coat! It hardly needed two, but I always prefer doing at least two regardless. However, Eye of the Tiger Lily is fairly sheer and probably needs at least three to four coats for full opacity. Good Bud-dy goes on more like a creme while Eye of the Tiger Lily is more of a jelly, very thin and a bit more watery. They both went on SO smoothly though, with no running or pooling and they evened out beautifully. 

As for wear, I had very few chips and tip wear and tear for about 2-3 days (with topcoat), but I do use my hands a lot for work, so that's fairly normal for me. I love the fact that they're 3 Free, and so far I like the range of colors they have. I'm hoping they'll put out more as well! I definitely want to pick up a few more!

Here are the other colors they have available: 
  • Go With the Flow-er - pale beige nude
  • That's Just Dandelion - peach ballet pink
  • Fanatical Botanical - metallic rose gold nude
  • Gorgeous Gerbera - peachy pink nude
  • May Flowers - medium pink
  • I Lavendare You! - grey-toned lavender
  • Thistle or That? - mint blue-green
  • What's the Daffodill - pink coral
  • Cosmos-politan - deep hot pink
  • Precious Poppy - poppy red-pink
  • First Bloom - bright red
  • Budding Romance - deep red shimmer
  • Venus Fly Trap - dark vampy red
  • April Showers - midnight navy blue
  • Make My Daylily - pale nude
  • Beige Beauty - yellow-toned beige nude
  • Don't Be a Wallflower - warm taupe
  • Aster Place - deep rosy pink
  • Berry Begonia - deep berry
  • Pansy Shmansy - deep purple
  • Bluebell of the Ball - grey-toned blue
  • Evening Primrose - metallic deep green


PURCHASE:


Here are the prices I paid for each item from my Walmart:

1) BB Cream 4-in-1 Skin Solution BB1 (1 oz) - $12.98

2) Shadow Play Eyeshadow Quad Secret Garden (6 g) - $9.98

3) Zoom-In Ultimate Mascara Intense Black (0.29) - $7.98

4) Win Some, Rouge Some Creme Blush Peach Blossom (0.14 oz) - $7.98

5) Glisten Up! Highlighter Chubby Pearl Shimmer (0.21 oz) - $9.98

6) Kiss Stick Velvet Lip Color So Gladiola (0.10 oz) - $6.98

7) Nail'd It Nail Lacquer (0.4 fl oz ea.) - $4.98 ea.


They can be purchased at your local Walmart (if they're currently carrying them) or on their website or go to Flower Beauty's website to view the line (no online purchasing):

www.walmart.com/flower

www.flowerbeauty.com


FINALE

Now for the fun part! Wearing the makeup! I wanted to go for something bright for Spring but as my eyeshadow is called...a Secret Garden look.


I used the BB cream all over my face, as well as the Glisten Up! Highlighting Chubby on my upper cheeks, down the top of my nose, on the inner corners of my eyes and on my cupid's bow on my lips. The highlighter shows up much better in person, it doesn't translate well in my iPhone photos. The only place you can see it well enough in these pictures is on the inner corners of my eyes.


For the eyes I used the peach shade below my eyebrows and towards the inner part of my eyelid right above the crease, then blended on the light moss green all over my eyelid, stopping at the crease. I used the teal shade on the outer part of my eyelid, pulling it out some in the wing, as well as blending it right under the outer part below my bottom lashes to balance the top. I finished the eyes by blending the rose shade from my crease and up lightly towards my eyebrows, as well as using a dark green eyeliner for a subtle wing. Now take a moment to LOOK AT MY LASHES! Notice the gentle curve, the volume, the length...I LOVE this mascara! Did you see my bottom lashes where my eyes are open in the photo above? HELLO! So pretty! Ok, now that I'm done drooling over my fabulous looking lashes (thank you Zoom-In Ultimate!), I can now go into how much I adore the gorgeous creme blush that looks oh so natural...doesn't it? It's just so soft, and gives you this amazing flushed appearance that I think it's just perfect for Spring. Also, I love, love, love the lipstick shade! I just use a light balm over it...it's just too darn pretty to let a little dryness bring me down. 


Well that's it for my Beauty Spotlight review on Flower Beauty! I hope you enjoyed it! It's been a long time coming, I'm just so happy my Walmart is carrying the brand now! I seriously must have been one of the first people to see the new display because they had everything there and the next time I went it was so picked over. I'm so very pleased with the brand in general! I think the packaging is gorgeous and different and across the line of what I've tried, I've been happy with the quality, pigmentation and wear. There were only a couple of minor things I'd change, but overall, I love everything! I certainly want to try out some more gorgeous shades from the brand, so I may include them in a Bag Full of Beauty post at some point. Let me know if there are any particular shades you may be interested in and I can pick them up to swatch and show you!


Happy Makeuping, you beautiful Flowers, you!